How to Rig a Cut Plug Herring 2
Whether fishing the river or saltwater in California, Oregon, Washington, British Columbia, or Alaska you'll at some point in your salmon fishing career need to learn how to rig a cut plug herring. There are quite a few different ways to skin this cat and here are just a few of the most common methods for rigging up a cut plug so that it gets just the right spin. When you're finished with this pop on over to a previous blog I wrote on Herring Brines.
The making of a salmon catching herring all starts right in the store when the bait is purchased. Check out the baits to make sure they don't have blood in the eyes or around the gill plates, yellow or brown blotches on the side of the fish, or freezer burn. After herring has been thawed and refrozen a couple times blood can usually be seen on the tray around the fish, an indicator that the bait will likely be soft or mushy. Leave this bait alone and keep looking until you find a package that has shiny and clean baits in it.
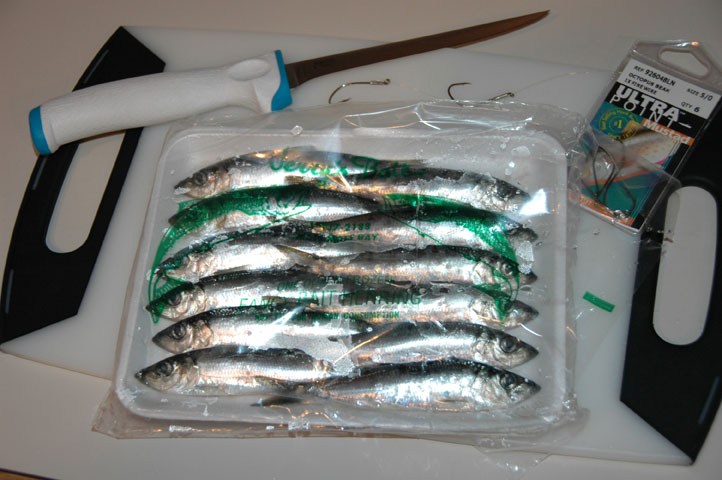
These herring have clean and shiny scales and a little clouding in the eye. A cloudy eye is fine, but try to stay away from baits that have blood in the eye.

Using a very sharp knife make your first cut by slicing back and forth just behind the gill plate at two different angles. Use as little downward pressure as possible to keep the cut nice and clean. This is where the herring gets it's spin and a less dramatic angle is sometimes wanted for king salmon and a steeper angle better for silver salmon, with the steeper angle making the bait spin like a bullet. If you're unsure how to make this cut purchase a bait mitre at Sportco or Outdoor Emporium and use it for a while until you get the hang of it. Bait mitre's have precut angles in them for "silver" and "king". Just insert the knife into the desired angle and oila…you've got the perfect angle.

Slicing thru the bait with a sharp fillet knife is the first step to making the cut plug.

Gently push on the belly cavity to expose the herring's guts and then used the knife to remove them from the fish. If these guts aren't removed they will eventually trail out of the belly cavity and tear the belly out of the herring.
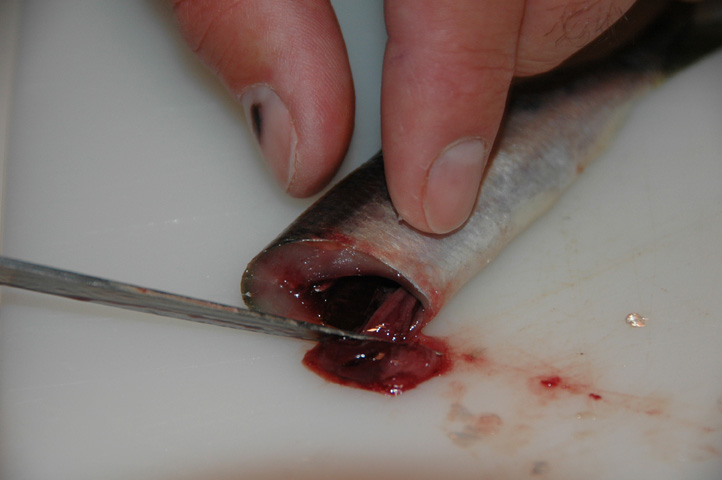
Notice the clean cut on the front of the herring with no torn edges on the bait.

The first technique for rigging the bait is what's called a Westport rig. Push the point of the back hook thru the side of the herring as far back in the cavity as you can get it and pierce the short side of the herring close to the lateral line or centerline of the bait.

Gently work the hook thru the side of the herring being careful not to open up too large a hole in the side of the bait. I like to tie my back hook with a short snell for this and be sure to trim the tag end off very close to the hook. A long tag end will damage the herring as the hook is pulled thru the side of the bait.
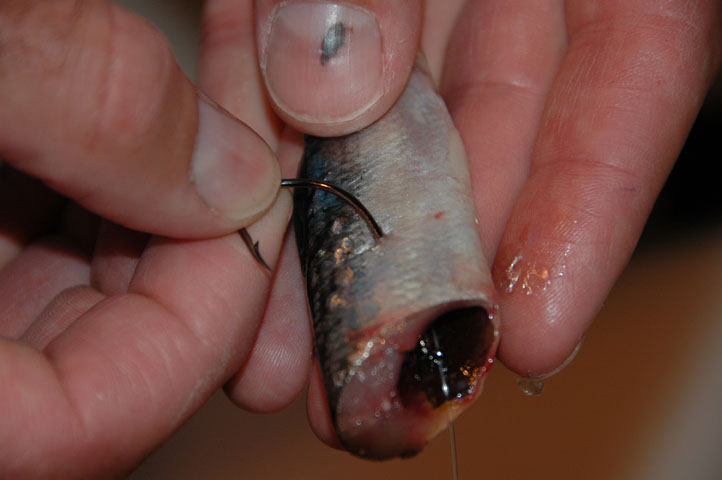
The hooks should be tied so that the trailer ends up fairly close to the tail of the herring. These hooks are tied about three finger widths apart from one another.

Run the front hook thru the top of the herring along the "long side" of the bait, up along the spine and out the top, making sure that the hook point is exposed in front of the bait when finished.
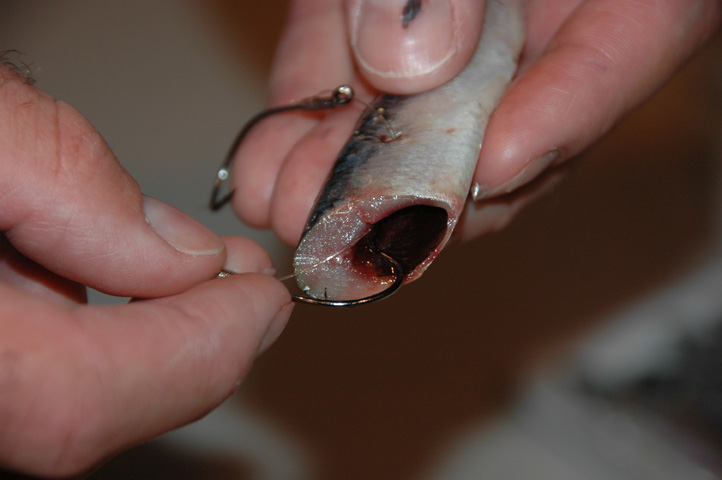
If the hook is too far back in the top of the bait the front of the herring will block the hook point. This hook is exposed just right, both grabbing enough meat to hold the bait on and having enough point exposed to penetrate a biting fish.

This is the completed bait with the trailing hook close to the tail. This bait is rigged with 4/0 and 5/0 Mustad thin wire hooks (Model 92604BLN) that work excellent for herring. Use the larger hook on the front of the bait and the smaller hook on the back. 4/0 and 3/0 hooks also match up well with a green label herring, but I like to use slightly larger hooks for our Alaska salmon fishing.
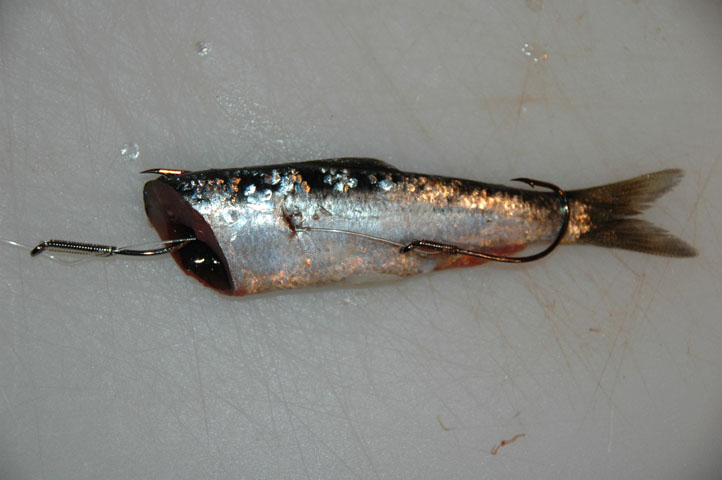
Below is an alternate method of hooking up the Westport rig that keeps the back hook from flipping up and grabbing the main line. The rear hook placement helps keep the hook from flattening out against the side of the bait when a fish picks up the herring. As with the trailing stinger-style rig the rear hook is placed on the inside or "short" side of the bait to make for a tighter spin. If the hook is placed on the long side of the bait the added weight of the hook will cause the bait to wobble or spin in a wide arc.

Here's a technique I like to call the San Juan rig because it's easier than saying the "Aggergaard" rig. Captain Jim Aggergaard of Catchmore Charters in the San Juans uses this almost exclusively for trolling herring in the Islands because it produces a tough bait that can handle the strong currents that often occur there.
Feed the rear and front hooks thru the side of the herring along the lateral line. The hole the hooks feed thru should be a little closer to the front of the herring than the hole placement of the Westport rig so that both hooks will align on the side of the bait later.

Insert both hooks into the side of the herring keeping them relatively close to the lateral line. The eye of the front hook should rest very close to the hole the two hooks passed thru. It's important to keep the alignment close to center on the short side of the bait to ensure a tight spin. The rear hook can also be placed on the other side of the bait if desired.

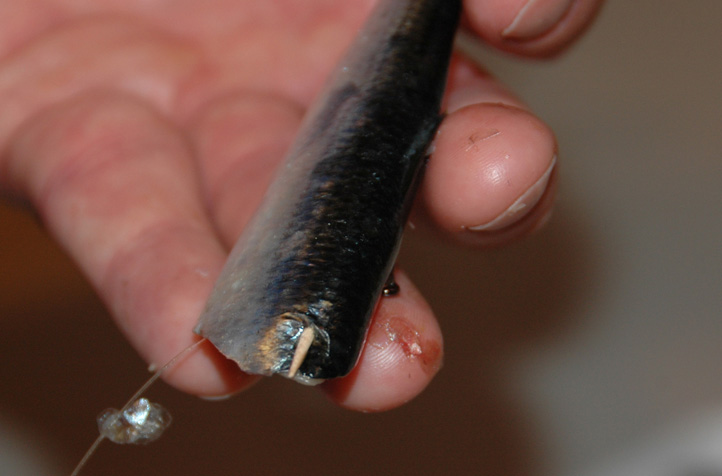
Here's the trick that makes Jim's cut plug herring tough as nails. Insert a toothpick into the front corner of the bait and run it all the way along the spine of the bait, keeping the bait as straight as possible.

Leave the front of the toothpick slightly exposed at the the top corner of the herring. When trolling cut plug herring from the downrigger in heavy currents the front corner of the bait is always the first part of the herring to "blow out" and fold back, reducing it's effectiveness and spin. This small portion of toothpick sticking out the front of the bait will hold the corner of the herring in place and keep it from doing that and the rest of the toothpick keep the bait straight. A well cured herring rigged in this style is good for a long tow on the downriggers.
For trolling it's tough to beat the effectiveness of the San Juan rig, but I much prefer the Westport style for mooching. It's much easier to rig baits up quickly when the bite's on! Don't forget to check out my previous blog on how to brine your herring to make a durable bait that king and silver salmon want to eat.
Here's a reference chart that shows what hook size to choose for each size of herring.

When I chartered in the San Juan Islands in the mid-90's I trolled cut plug herring almost exclusively for winter blackmouth and nowadays we burn thru as much as 15 cases of herring per boat running charters in Craig, Alaska. That's over 6000 cut plugs that get mooched off my boat, the "Polar Bear" during a busy summer of fishing in Alaska. If it didn't work so well you can bet that we'd be doing something different!
Capt. Rob Endsley

Excellent tutorial Mr. Endsley, especially the downrigger troll technique!
Great info here Robbo. This post will always be available on the Resource part of this site so tell your friends.